Handmade Halloween
I’ve created lots of Halloween based crafts over the years using simple, readily available materials and basic 3D techniques. Over the next month I’m going to add some of them onto this post for people to use in the lead up to October 31st . . . I’ve also included a few projects inspired by the Mexican Day of the Dead (Dia de los Muertos) a festival celebrated around the same time of year which possibly harks back to earlier Aztec rituals and ceremonies.
Firstly, here’s my ‘Cardboard Tube Vampire Bat’. This is a great little project and one which is a great example of what I call ‘pure making’ where all of the parts of the original materials, in this case a cardboard tube, get used up as different elements of the design. You just need a pair of scissors, a pencil and some masking tape, a little bit of glue . . . and later some paint to colour it. You could take this further too, maybe hang it from string, or ‘upside down’ from wire. You could paint on some ‘glow-in-the-dark’ paint or attach it to a hat or costume.
Next up is this simple ‘Egg Box Mask’ . . . this is a really effective way of creating a simple face by using up all of the fantastic shapes contained in the design of cardboard egg cartons. I’ve created a ‘Vampire’ here but this could easily be adapted and altered to create different monsters or creatures.
The size of the carton lids mean that this is more suitable for younger children but it would be pretty easy to add extra pieces in order to make a slightly larger version. You could strengthen this with paper mache if you wanted it to be more durable or maybe add some PVA glue to the paint you use to decorate it.
If you are looking for a simple bit of painting fun then these ‘Symmetrical Sugar Skulls’ are really straightforward and creative and suitable for all ages. These could be based on traditional Mexican designs or you could just create spooky Halloween skulls or even pumpkin faces.
One simple fold in a sheet of paper allows you to build up a symmetrical design by adding the colours one at a time and ‘printing’ them onto the other half of the paper. If one of the colours doesn’t work, or dries too fast then it’s easy to just repeat the process with more paint! You’ll notice how I’ve taped down one side of the paper to keep it firmly in place. You could try all sorts of designs for your skull, change the colours and patterns, or even try painting onto different coloured papers.
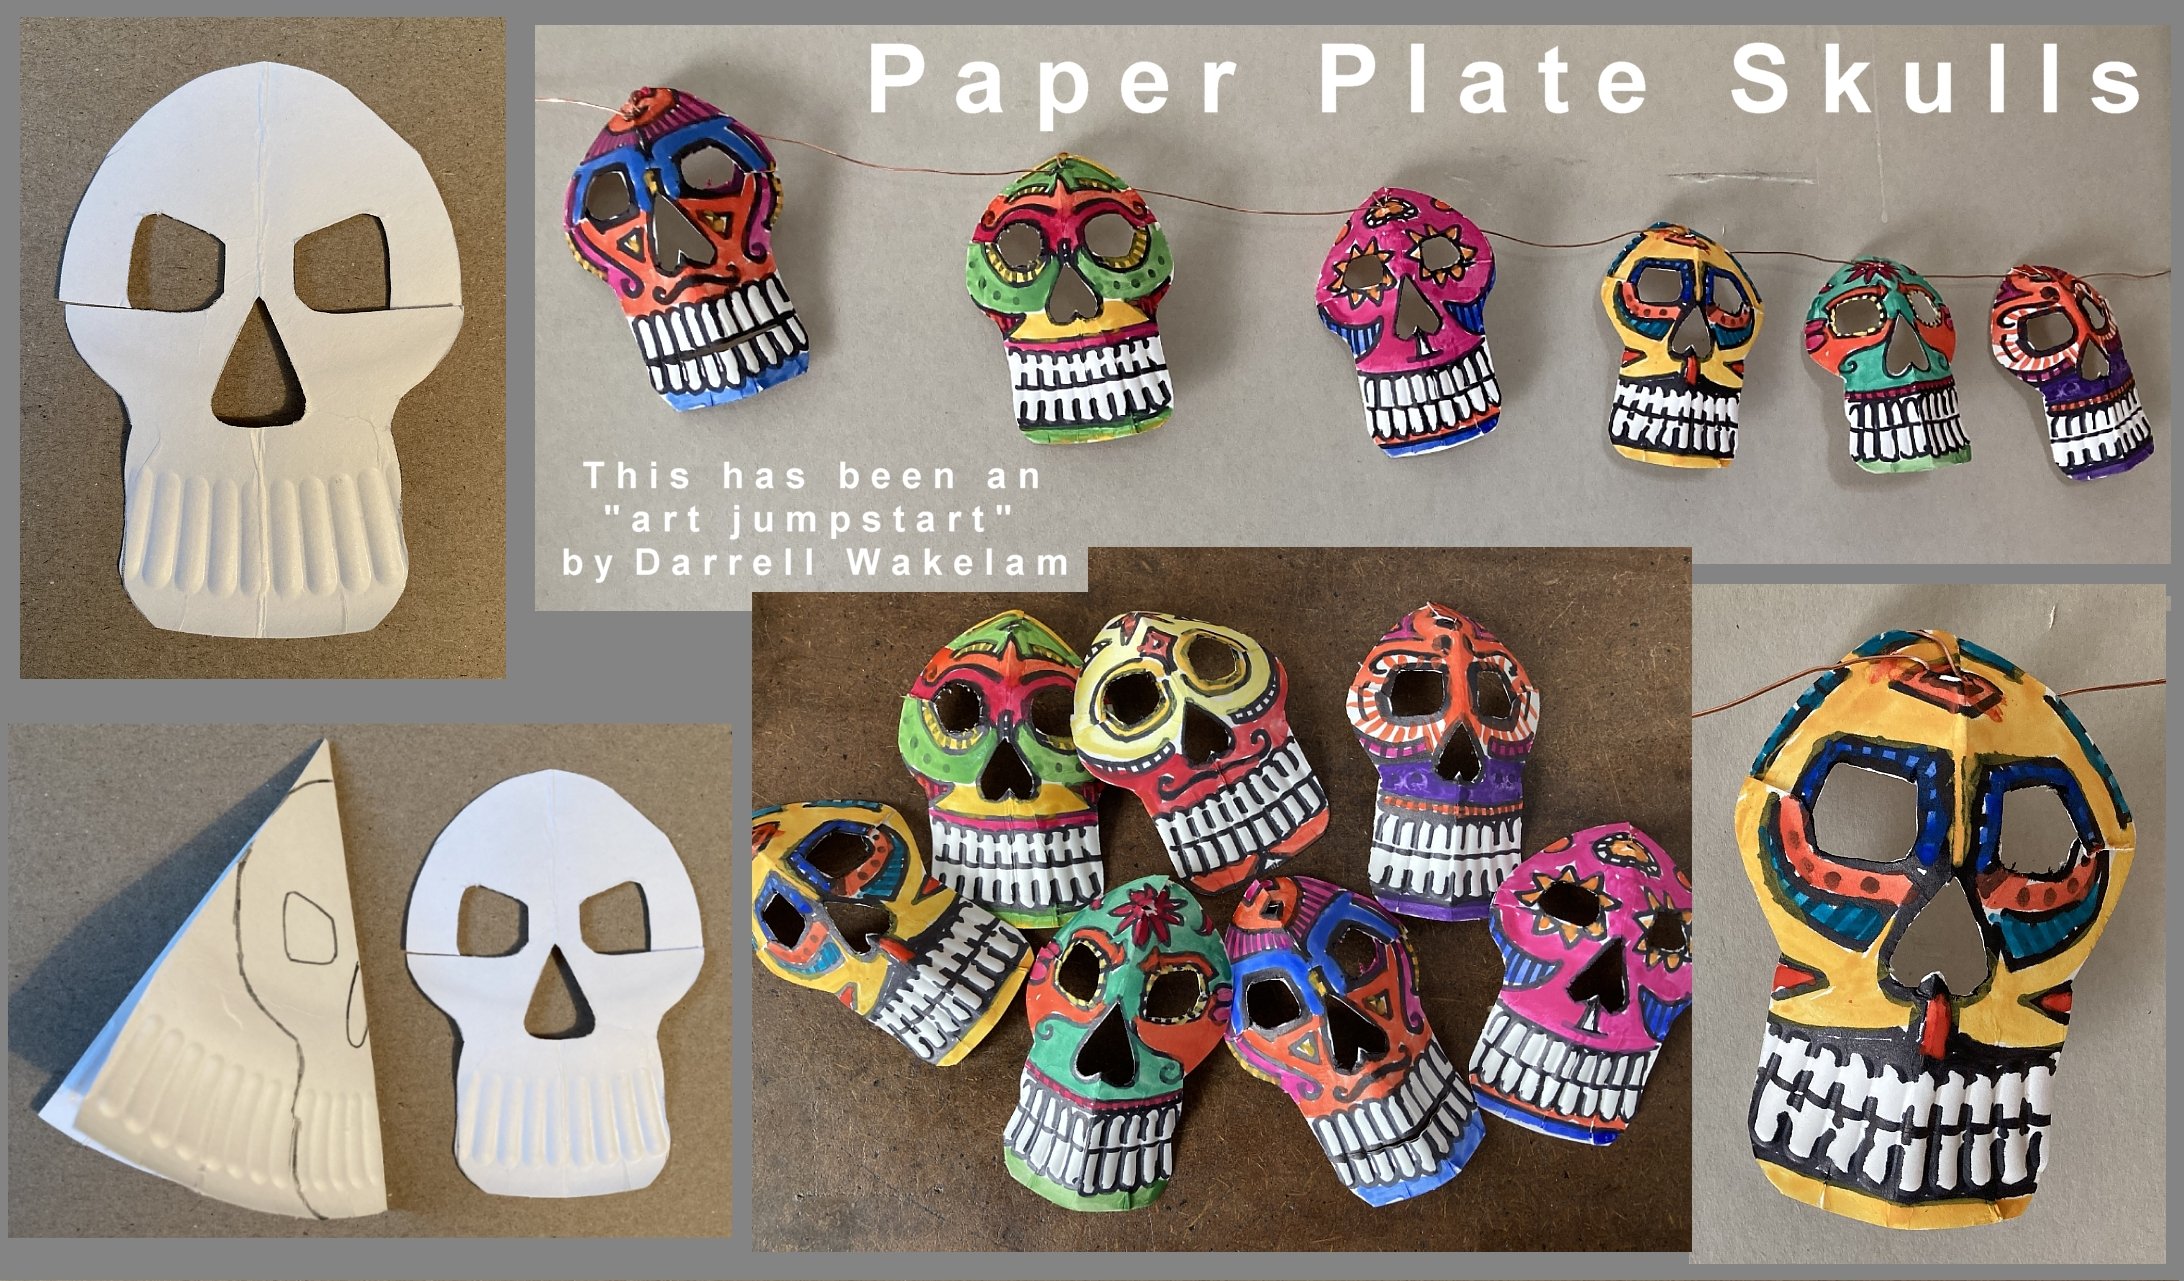
If you want some simple ‘3D Sugar Skulls’ then these designs cut from paper plates are perfect. One paper plate makes 4 skulls and you can decorate them in any way you like. Mine are obviously inspired by traditional Mexican ‘Day of the Dead’ designs and this would be a great way of exploring this theme and how a different culture celebrates and remembers their lost loved ones.
. . . if you have a sharp pair of scissors you can even cut all four at once!
I’ve used a permanent marker to draw on my designs so that they don’t ‘run’ when the colours are painted on, but you could just colour these in with crayons or felt-tips if you wanted to. You can even cut a notch in the top of each skull and hang them up like bunting too, here’s some step by step instructions if it helps . . .

Here’s a simple ‘Paper Plate Pumpkin Mask’ . . . I often use this method for creating simple masks and for younger children a paper plate is perfect, it’s about the right size and usually made of slightly stronger paper so it makes the final mask a little more durable. This particular idea incorporates my ‘pure making’ method, where every piece cut from the original plate is then reused as a different part of the design, a concept explored in great detail in my forthcoming book “Art Shaped”.


You could make the mask a little stronger by pasting on a layer of tissue paper (orange?) with watered down PVA glue, or you could just paint it like I have. To wear the mask you could easily punch holes and string it with elastic or, simply cut a thin strip of card to size and tape it to either side, sliding the mask carefully down onto your face like a ‘fencing mask’. This blueprint could easily be adapted to create other designs, monsters, skulls, bats . . . all sorts of creepy characters.
How about a Creepy Cardboard Hand! This is obviously inspired by ‘Thing’ from the fantastically spooky “Addams Family”.
It’s a pretty simple bit of construction using one cardboard tube cut in half to create the palm and forearm, and then some rolled-up tin foil to make the ‘posable’ fingers. I’ve simply taped this together and then covered it with a layer or two of cheap tissue paper using watered down PVA glue (50/50).
You could paint the ‘hand’ or leave it the colour of the tissue paper like I have. You could even try your own bit of stop-frame animation like I’ve done at the end of my video here!
Here’s another design based on the Mexican ‘Day of the Dead’ . . . my ‘Cardboard Calaca’ is a simple pop-out skull that you can adapt and add your own decoration too. It does involve some fairly tricky cutting to begin with but you can always simply things, for example, you don’t have to cut the teeth out, you could stick some on later.
I’ve painted my designs on with a small brush and then, once dry, I’ve added detail to them using a permanent marker, but you could use crayons or markers for the whole thing.
You can also take the design a stage further and create a whole skeleton using the same pop-out method . . . you can see this in the following recipes. Calaca’s are commonly used in Mexican ‘Day of the Dead’ celebrations, they are simple decorations depicting a skull or skeleton, often dressed in traditional costume or adorned with flower motifs.

